Can I write an interesting blog post about an espresso maker? Here’s a try.
Paul Erdős (and other people) said that “a mathematician is a device for turning coffee into theorems.” Along the same lines, some of us believe that a programmer is a machine to turn coffee into bugs. I guess I’m an unusual programmer: for years I was able to create tons of embarrassing bugs without the help of caffeine. In fact, I only started drinking coffee regularly after I turned 40. My preferred coffee drinks are espresso-based: cappuccinos, mochas and lattes. San Francisco has spoiled me in that respect, because the quality and variety of coffee and coffee shops here is outstanding. Over the past couple of years having a cappuccino has become the second thing I do after I wake up. The first one is checking email. The third one is getting dressed, unless I have to go outside to get coffee. In that case I have to swap 2 and 3 because it’s cold outside.
A couple of years ago I found a good deal on Craigslist: a Gaggia MDF burr grinder and a Gaggia Deluxe espresso maker for a couple hundred bucks. A few weeks after that I moved into a furnished house that had a beautiful La Pavoni in the kitchen. I kept the grinder for home, and took the Gaggia Deluxe to the office. I used it there for a while, until IndexTank moved to Valencia street in the Mission neighborhood. It turned out that our new office space was a few doors down from Four Barrel Coffee in San Francisco. Of course I couldn’t even begin to compete with their sophisticated machinery and barista wizardry, so I became a regular at the place and abandoned the Gaggia. Months went by, and I don’t know if anyone else used it in the meantime. For all I know the poor Gaggia must have felt abandoned like Andy’s toys in Toy Story 3. Except for Woody. He took Woody to college with him, right?

Fast forward to a month ago, when I moved out of the furnished house to a new place. Naturally I rescued the Gaggia from the office to have it provide my morning cappuccino. The first time I tried to use it I found out it wasn’t working. I saw that the flow of water from the grouphead (the bottom of an espresso maker where you insert the portafilter) was a pathetic drip. What to do? I tried cleaning everything that was reachable, letting steam out of the machine, no dice. As a software guy I tried turning it on and off several times, of course that didn’t work either 🙂 Unlike most of our modern appliances this machine is purely electromechanical, and it contains no software. It doesn’t even have a power supply, it works with AC power.
I decided to search coffee enthusiast forums for help. The first advice I found was to descale the machine. It seems that if you use hard water to brew your coffee, minerals build up inside. Once in a while you’re supposed to run some chemicals to clean it up, so I bought some descaling powder. I dissolved it in water as instructed, and spent a long time running it through the machine. Alas, it only made things worse. At this point I was almost ready to kick the Gaggia to the curb, and then a sudden realization came to me: “Hey, I’m an electrical engineer! I studied this stuff in school! I should take it apart and see what’s going on inside.” So I did.
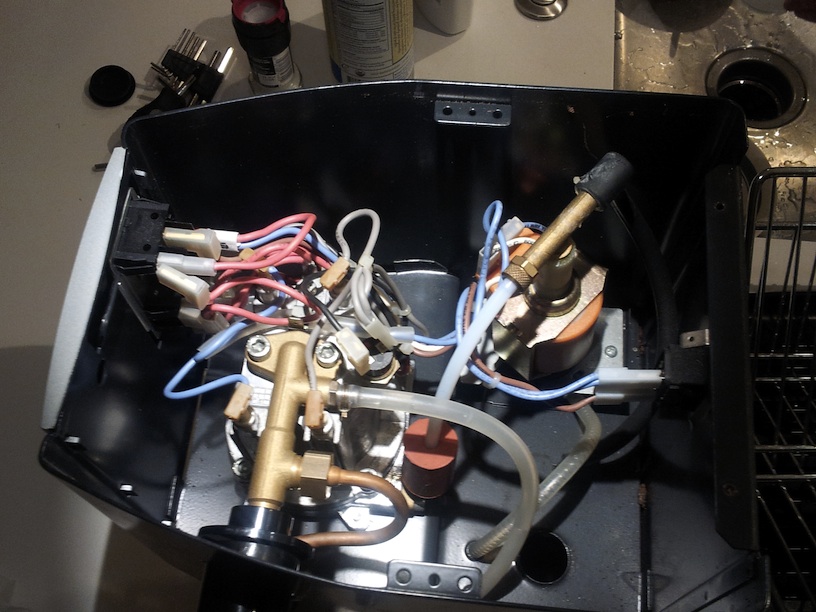
There are two main components that you can see in the picture: the pump (top right) and the boiler. The working principle is very simple: the pump sucks water from a reservoir and injects it into the boiler. The boiler heats the water electrically until it’s close to the boiling point. There is a temperature sensor attached to the boiler that shuts off electricity then. The water has two ways out of the boiler: either as steam through the golden valve at the top (which leads to the frothing wand), or as hot water through the grouphead at the bottom.
First of all I disconnected all the cables you see in the picture. A decade ago I would have taken notes, but now I have this convenient pocket computer that takes pictures worth dozens of words. Next, I took out the boiler.
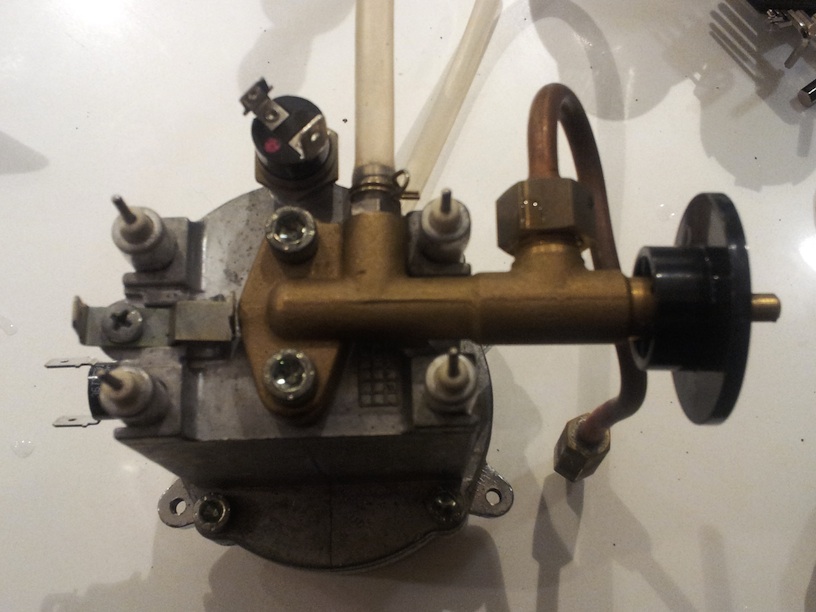
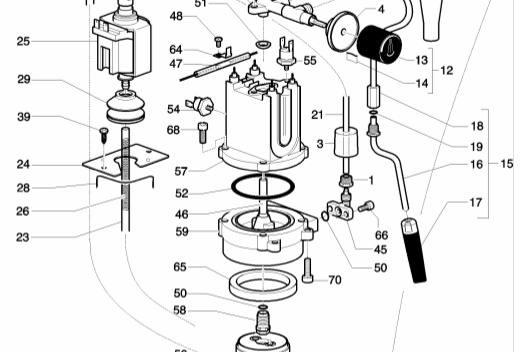
I took apart the boiler and gave it a thorough cleaning. There was one nut that I couldn’t undo because I didn’t have a wrench handy, but I didn’t think that would be a big deal. It was the one holding part #58 in the figure below.
I put everything back together, still not working. Could it be the pump? I took it out, it was an Invensys CP3A that isn’t made anymore. I gave it a good old cleaning and put it back in.

I tested the Invensys pump on its own (detached from the boiler), and it pumped water into a glass with significant pressure. At this point I was puzzled and almost ready to give up. As a last resort I took the boiler apart once again, only this time I got a wrench to unscrew the nut that held part #58 together with part #46 (a copper pipe). I assume the purpose of that pipe is to collect water from near the top of the boiler, where it will be hotter. I tried to blow through the pipe but I couldn’t, which seemed weird. Bingo. The clog was in this copper pipe in the heart of the boiler. I gave the little pipe a “floss” with a tiny allen wrench and put everything back together.
By now I had probably spent several hours over the course of three nights tinkering with this machine, so there was a lot of tension and anticipation as I fastened the last few screws. I turned on the pump. Seven seconds went by, but they seemed more like nine to me. At that point a torrent of hot water came gushing out of the grouphead. Success. Happiness. COFFEE!!!!!1 Of course I had a celebratory shot, even though it was bedtime. Bad idea of course.
So here are my conclusions after this little journey:
1) In some ways this machine is the complete opposite of the Macbook Air I’m using to write this post: it’s designed to be tinkered with. It’s not built to become obsolete. I can’t remember the last time I found an appliance that was so easy to understand and fix.
2) Both the Macbook Air and the Gaggia Deluxe are beautiful, only in different ways. There are design details inside the Gaggia that make it very clear that these people know what they’re doing. It’s very hard to mess it up. For example, there are several live 110v electrical wires very close to water, but you’d have to try hard to get them wet. There is enough space inside the machine to insert wrenches or screwdrivers as needed. The pieces of rubber and wire retainers used were chosen for functionality, durability and convenience.
3) This machine is not that expensive, and I could have thrown it away on day one. If I do the math, I probably put more billable hours into this machine than its retail price. However, I really wanted to tinker with it for fun. I figured that if I could fix it I’d value it more because of the “IKEA Effect.” No surprise there, I love this machine now. The delicious espresso that comes out of it tastes better to me than anything I can get at a coffee shop.
4) Italians know how to build beautiful machines. Does any reader have a Ferrari Testarossa that I could take apart? I’m pretty confident I’ll be able to put it back together.
Still with me? Follow me on Twitter just ’cause.
Loved your post! I came across it while searching for a malfunction in Gaggia classic. One of my two silicon hoses does not suction water! ( too bad I’m not an electrical engineer) anyways, I had fun reading your post!
Hi!
I´d like to buy a Boiler assembly V 120-220-240 to Gaggia de luxe.
Do you know where I can find one?
Best Regards
Mats Alme
Gothenburg, Sweden
This post has motivated me to tackle the task of trouble shooting my Gaggia Classic. I will let you know if I am successful! – Maher Hound
Thanks for the detailed post! I had the same problem with my Gaggia Espresso Deluxe yesterday and happily stumbled upon your post. I disassembled it last night, cleaned all the internals good with some Cafiza and a scrub brush, cleaned out that hole in part #46 (according to the diagram) good with some surgical swabs (like q-tips)–finding it was very clogged, put it back together this morning, and the flow was back 100% and I made the best shot of espresso I’ve ever made on this machine.
As a bonus side-benefit, doing this also cured my problem of water constantly dripping through the shower screen as long as the machine was on and water was in the boiler. It seems that the mineral buildup on both the bottom side of part #46 and the rubber seal part of the group valve (#58) were not allowing the valve to ever fully close.
Incidentally I just found an interesting video on Youtube titled “Gaggia Espresso Group Valve Cleaning.” The machine used in the video is a little different than ours (in their machine it is a little simpler to remove the group valve assembly), but the way they show to clean this part is a bit easier, not requiring the complete disassembly of the boiler.
I’m happy that I disassembled it all and cleaned it really well (and removed some calcification and yucky metal shavings from inside my boiler in the process…), but the “shortcut” method highlighted in the video may be good regular maintenance of this passageway in-between the “major service” of complete disassembly and thorough cleaning.